
Jobs a goodun


Jobs a goodun
YouTube - Toms Custom Shop
https://www.youtube.com/channel/UCro...hD-y5NuJyZAA2Q
8.43 @ 157 - Rail
10.37 @ 128 - Doors


thanks Tom
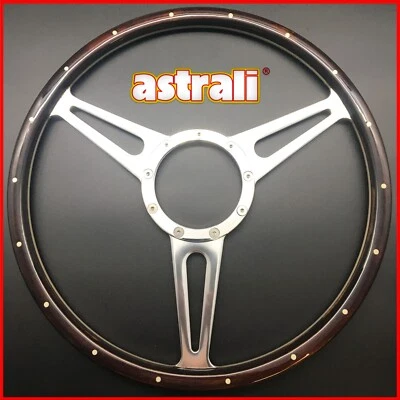
i've been looking at different steering wheels for my nash and decided and bought this 15" astrali wood rim one.
neil.
ok, call me a tart/poser but i just ordered 2x 3" electric exhaust cutouts for my nash.i say 2x not a pair as 1 was on offer so ?10 less than everyone else so i bought that and a 2nd from elsewhere.
neil.
hopefully the 360 engine i have will fire up and run well enough to go in my nash while i build a 390 for it. i've got the inlet adapter and tunnel ram now and i'm looking into a retro fit roller cam swap. the cam and lifters will add up to about ?800 which sounds a lot but it'll eliminate the issues with flat tappet cams/lifters. we'll see.....
neil.
so i've ordered more bits and bobs for my nash and it's started to arrive. a lump of 8mm aluminium plate to unmodify the top of the tunnel ram, a pair of 1/2" phenolic spacers with studs to a) insulate the carbs and b) keep the carb linkages off of the above plate. also countersunk m6 allen bolts and nylocs to hold the plate to the top of the tunnel ram, a valve spring installed height checker, a new pair of butch crocodile clips for my big boy's snap on battery charger/starter and both of the electric 3" exhaust cutouts. oh and the very pretty steering wheel too
we got the plate cut to size, the holes cut out to the open spacer's size and the stud holes drilled ready to tap. then it was full stop as we couldn't find a 5/16 unc tap.... bu66er
neil.
the thread taps arrived today, too late to get out and cut the threads though. we'll get that done tomorrow along with some countersunk holes in the plate and through the top of the tunnel ram so we can attach it.
neil.
edit, i also ordered a nice shiny centre/horn push for my nice shiny steering wheel.
Last edited by mygasser; 23-03-26 at 11:39 PM.
i took delivery of a 4" length of 4" internal diameter stainless tube today. i intend to make an adjustable tapered piston ring compressor to make future engine builds a little easier.
neil.
today we tapped the stud holes in the ally plate and loctited the studs in place. next it's neatening the edges/corners and drill/countersink it to bolt it to the tunnel ram.
neil.

Neat job Neil
thanks, it's taking too long but we'll get thereOriginally Posted by jsf55

neil.
a little more done today, just need to cut the bolts to length ready for final assembly. that is once all the black paint's stripped off.
it wasn't much but it seems more..... which is good.
neil.

today we set to on the tunnelram base with my (lidl's own) sawzall and a couple of grinders. all the bits that interfered with the adapter are now gone and it fits a treat. the corners/edges of the carb plate are smoothed off and the super length bolts are all cut to length. we're waiting for blast media now to remove all the paint from what remains of the tunnel ram
neil.

that's that done then, even though we didn't need to do it yet. but i couldn't resist
neil.
we started to remove the paint from the tunnel ram today.... i know i said we'd start the engine run stand but i got distracted. so sue me, lol. well it appears it's not painted, it's powder coated. my heat gun wouldn't touch it so out came the plumbers torch, that works a 'bit' better then. we got just over 3/4 of the way round the base section in about 1 1/2 hours! bl00dy hell that stuff's hard! then it was dinner time which seemed strange so early.... 'til i noticed i'd not changed the clock in my garage, doh! pics tomorrow after hopefully finishing the base and top sections. they will need blasting as the primer powder coat doesn't fully come off. the sand/garnet/blasty rough stuff arrived today as well as the handheld spot blast gun so we'll give that a go tomorrow too.
neil.
Last edited by mygasser; 31-03-26 at 10:52 PM.
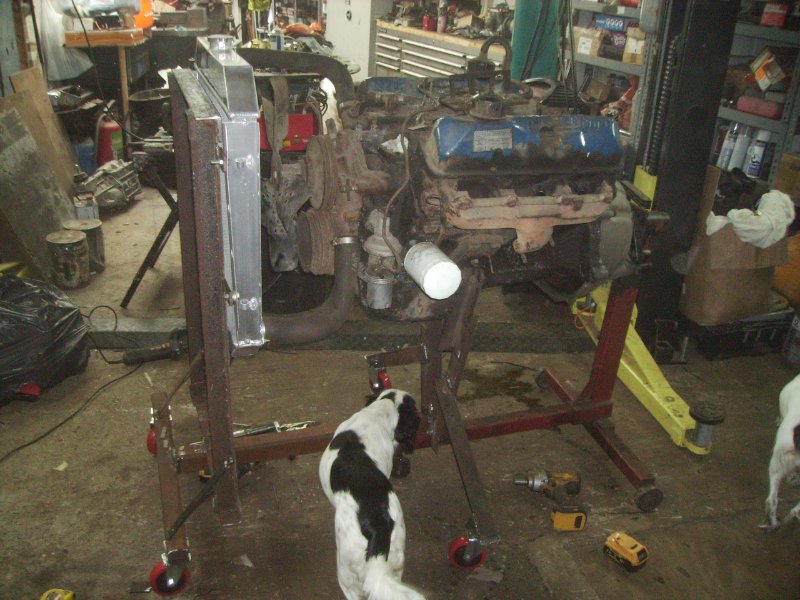
we made a start on the run stand today.... finally. we grabbed my engine build stand from over the road as well as 1/2 of the 2" angle iron work bench ashley saved from a skip at a place he worked. first job was remove the seized carb from the 360, redrill my lift plate to suit and bolt that in place. then we could lift it up and remove the iron bellhousing and clutch and bolt on an ally fmx bellhousing. then the build stand's mounting 'spidery' thing was bolted to the bellhousing and slid into the stand. we cut a 2x4 to sit under the sump down tom the stand which held the engine slightly uphill, ideal to run it. lastly before dinner stopped play we cut and bent some more 2" angle and bolted them to the engine mounts while pointing down to the middle 'leg' of the stand. the plan is the engine will be held at those 3 places and the whole shebang will be stabilised by a cross beam on an extension of the middle leg to which a radiator and dash mount will bolt. either side of the cross beam will be new swivel castors keeping it all mobile.
hopefully we'll get it done ready to test the 360 by some time next week (read... next weekend, lol). we'll get more use from it once we've built ashley's 352 and later my 390 so it's all worth it. plus by just changing the engine mount section it can take other engines too.
neil.
forgot to say i made an offer for a pair of chedelbrock 500cfm carbs today on ebay. it wasn't a daft offer so we'll see how it goes, fingers crossed.
neil.
we got all of the run stand frame made today and the radiator mounted with top and bottom hoses. we added the front crossmember with castors as above but i wasn't happy with the engine's stability so we also put a stabiliser off of each side's engine mounting leg. that fixed it, it's solid now.next it's add a 'dashboard' so we can moniter the vitals and have an ignition switch. oh, and we'll have to fit a battery/fuel tank tray too. we're getting there though and by removing 1/2 a dozen nuts and bolts the engine build stand is back to stock and the rest breaks down to 3 seperate bits so not too bulky.
neil.
Passes the sniff test then......
Chris
Bumper sticker - This is an historic vehicle and only has three speeds....... if you don't like this one you sure as hell won't like the others.
At least if the bottom end blows out it'll be easy too spot
 Posting Permissions


 Reply With Quote

