Page 56 of 56 FirstFirst ... 646545556
Results 1,101 to 1,113 of 1113

Thread: a bit of this and a bit of that.

  1. #1101
    NSRA member mygasser's Avatar
    Join Date
    May 2009
    Posts
    8,408
    we've done some more surgery today cutting the other inner wing top etc away. the lower part between the 'cradle legs' hadn't been repaired this side so that's gone too. we'll trim it back fully then offer the templates up from the other side, the drivers side has a recess to clear the servo so a little different there for sure.
    neil.


  2. #1102
    NSRA member mygasser's Avatar
    Join Date
    May 2009
    Posts
    8,408
    we only made the top section of the cradle today as a) other stuff needed doing and b) it was too hot, lol. still it all needs doing so anything's something right?
    neil.

  3. #1103
    NSRA member mygasser's Avatar
    Join Date
    May 2009
    Posts
    8,408
    the 2nd part of the cradle is now made and both are welded in place. we'll nib the high spots off the welds and fold up the new inner wing parts next.
    neil.

  4. #1104
    NSRA member mygasser's Avatar
    Join Date
    May 2009
    Posts
    8,408
    we've been trimming some more rot today on the zephyr, first at the bulkhead to inner wing and also at the inner wing to front panel. the large o/s inner wing template looks like it'll work once flipped over for this side which is good. then we did some more cad work for the bulkhead to inner wing areas.
    neil.


  5. #1105
    NSRA member mygasser's Avatar
    Join Date
    May 2009
    Posts
    8,408
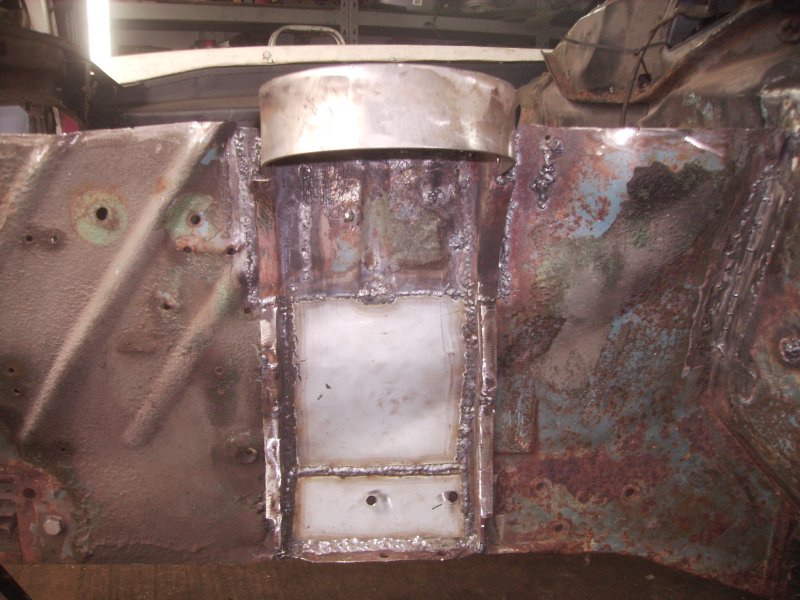
    those templates are now transferred to steel and welded in place. too late for grinding so pics tomorrow.
    neil.

  6. #1106
    NSRA member mygasser's Avatar
    Join Date
    May 2009
    Posts
    8,408
    before we could fully check the larger (front) inner wing template we had to start the slam/front panel repairs so the inner wing had something to meet up with. with 3 sections made and welded in place we bolted the template to the strut top to check fitment. we also mocked up the outer wing to check the 'upstand' part of the inner wing. this is where the trouble started. if you've been following you'll remember we bolted the strut extender under the original strut top panel the bolted the ally strut top to that. then we added bits of tube etc to hole the ally strut top in place while the top of the inner wing/strut top panel was cut away. this was done both sides to keep the struts when refitted exactly where they were originally. that's where the problem was, the original inner wing/strut top panel. when we folded the upstand part of our template up it sat higher than the outer wings lip, not just a bit but a lot. so we took more measurements up from the chassis rails to the strut top panel and the n/s is a) 1/2" higher but also b) angled up more as it goes 'out' towards the wing. bugger! it means the 2 inner wings where they'd been extensively patched over the years were at some point welded together wrong. either one's too high or one's too low. now at this stage the o/s is fully welded whereas the n/s only has a few welds on it. so tomorrow's plan is to release the n/s cradle and match it to the o/s. what a palaver. we did clean up yesterdays welding so that's something.
    neil.


  7. #1107
    NSRA member mygasser's Avatar
    Join Date
    May 2009
    Posts
    8,408
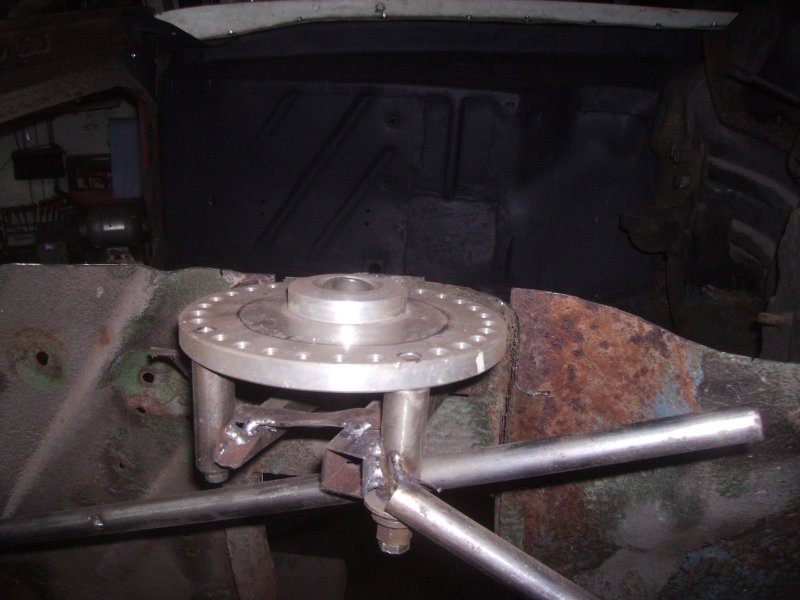
    well that wasn't as bad as it seemed, it's now a match for the o/s both in height and angle. we made a simple wooden frame that bolted to the strut top and sat on the chassis straight down. we cut the n/s cradle free, bolted it to the wooden frame and sat it back in place. with a couple of tacks we measured every which way and sideways comparing both sides and we're happy now. next was to cut plates for the outer chassis rail and inner wing and fully weld them in place. the legs of the cradle that weren't connected apart from 2 small bits at the top and the bottom, but nothing from top to bottom were also seam welded in place. lastly a good grind up of the welds in the engine bay and that's enough for today.
    neil.
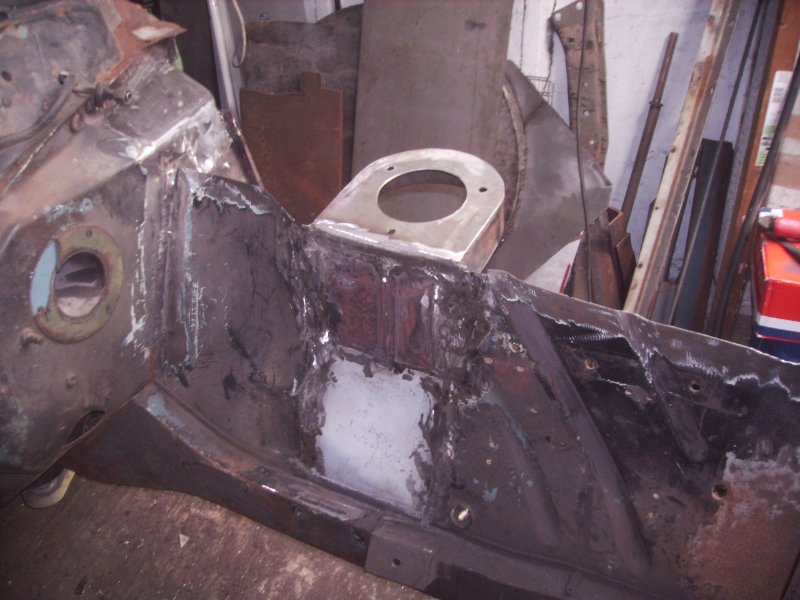
    ps the second pic shows the 'backside' of most of the welding so not as neat as you'd like. we decided to leave it as it'll be hidden and will be stronger as is.


  8. #1108
    NSRA member mygasser's Avatar
    Join Date
    May 2009
    Posts
    8,408
    firstly today my ocd couldn't look at those welds under the wing, even though they won't be seen after final assembly. so we did some clean up, mainly just 'nibbing' off the high spots but it does look better. so on to the inner wings, we fitted up the templates and they fitted pretty good even to the fibreglass wing and we all know how out of kilter they can be after sitting around a while. moving on we cut the steel sheet to match, rolled/folded the inside and outside edges and they are both now bolted and tacked in place. again it was getting late and more importantly dinner was ready so there's no pics yet, lol.
    neil.f

  9. #1109
    NSRA member mygasser's Avatar
    Join Date
    May 2009
    Posts
    8,408
    well that's that side done too. sounds easy when you say it like that, lol. we've got a few small repairs on the front panel and we can move underneath to connect the inner and outer sills together. would've been easier to make the inner sill repairs before fitting the new outers but hey ho.
    neil.


  10. #1110
    NSRA member mygasser's Avatar
    Join Date
    May 2009
    Posts
    8,408
    well this is a turn up for the books, our 15 year old grandson (who lives with us) wanted to do his 'work experience' in my garage working on old/custom cars . he learned how to fit nutserts today.... and how to run out halfway through the job amazon will have them here tomorrow so until then he may have to learn/observe how to weld
    neil.

  11. #1111
    NSRA member mygasser's Avatar
    Join Date
    May 2009
    Posts
    8,408
    also today i ordered the steel we'll need to push the left side of my garage out to almost the house (replacing what we call the 'side shed'). it'll give us about an extra 7 feet in width from the front to a foot or so past the left ramp post. we'll get my mate the steel fabricator to fold the box gutter in his big (10 foot long) folder from galvanised sheet so there'll be no overflow issues there. the gutter will probably be at the 'join' between the edge of the current garage roof and the new extension roof. we need somewhere for another bench that we can mount the shrinker/stretcher, english wheel and bead roller to amongst other things plus it'll give more room to work that side of the shop.
    neil.

  12. #1112
    NSRA member mygasser's Avatar
    Join Date
    May 2009
    Posts
    8,408
    back to the zephyr, we cut out the patches of rot on the front panel each side and plated them all. then up a bit and into the engine bay, on the back of the slam panel there's a 'formed' box section above the radiator that was mostly gone right across. so that was cut out, a new section folded and welded in place. that finished to rot replacement from the bulkhead forward finally. we unbolted the mockup steering rack and sat the crossmember, tca's and anti roll bar on the workmate so we could lower the car over it to bolt it in place. the capri crossmember is partly altered to fit to the zephyr chassis so 1 bolt each side currently holds it up. we can now drill the last 2 horizontal holes and weld 2 sections of 3mm plate to the crossmember going out to the outer 2 vertical holes each side for full securiocityness. then the front anti roll bar to chassis mounts need to be made to bolt to the corner brackets at the front of the chassis.
    neil.


  13. #1113
    Moderator jsf55's Avatar
    Join Date
    Sep 2003
    Posts
    16,366
    Images
    59
    Securiocityness Sounds good to me. Great progress

Posting Permissions

  • You may not post new threads
  • You may not post replies
  • You may not post attachments
  • You may not edit your posts
  •